Feeling overwhelmed by the number of tools available for your oprganization’s front-end build pipeline? Don't worry. We're sharing all we've learned about these tools while working on our projects and summarized it here. This comprehensive guide is designed to provide you with the knowledge and confidence to navigate the complexities of modern front-end development, mitigating difficulties and improving results.
Introduction
Modern web development has come a long way from the days of manually writing HTML, CSS, and JavaScript in a simple text editor. The front-end ecosystem has grown exponentially, with many tools, frameworks, and libraries now available to developers. Because of the expansive choices available and the need for compatibility among them, deciding which to include in your organization's front-end build pipeline has become more complex than ever.
We'll show you six ways modernizing your front-end build pipeline streamlines development, improves performance, and ensures maintainable code. These tools will, most of all, allow you to build innovative features and create exceptional customer experiences that will inspire customers to return to your app and use it more often.
Implementing a JavaScript Framework or Library
Modern front-end development often relies on powerful JavaScript frameworks and libraries like React, Angular, and Vue. These frameworks simplify development, improve code quality, offer pre-built components, and provide support, making the development process more efficient, maintainable, and scalable.
- Efficiency: Frameworks provide pre-built components and tools that make development faster and more efficient.
- Code Reusability: Frameworks promote code reuse, allowing developers to use pre-built components and libraries, saving time and effort.
- Best Practices: Frameworks come with established guidelines and coding conventions that improve code quality and maintainability.
- Abstraction of Complexity: Frameworks handle complex tasks, such as browser compatibility and data management, so developers can focus on the core functionality.
- Community Support: Frameworks have active communities that offer developers resources, knowledge-sharing, and support.
- Scalability and Maintainability: Frameworks provide features and patterns that support application growth and long-term maintenance.
- Security and Performance: Frameworks include security measures and performance optimizations to ensure robust and efficient applications.
Here's an overview of the pros and cons of each framework:
 Angular
Pros:
Good performance and maintainability
Extensive tooling support (Angular-CLI)
Solid framework for large-scale projects
Built-in support for mobile app development (Ionic)
 ReactJS
Pros:
Efficient rendering with virtual DOM
Faster loading times
Logic and markup in one file
Easy to start and learn
Suitable for highly interactive web applications
Cons:
Not suitable for building MVC architecture alone
May require additional libraries for complex apps
Can be overwhelming with the large number of options and libraries available
 VueJS
VueJS
Cons:
Limited community support, especially in English-speaking regions
Certain areas of development can be overcomplicated due to excessive flexibility
How to choose one framework for your project:
-
Consider the Learning Curve: React's learning curve is straightforward, Vue's is known for being beginner-friendly, and Angular's is steeper.
-
Evaluate the Project Size and Complexity: React is suitable for projects of any size, Vue is versatile for different project sizes, and Angular is often preferred for more extensive, enterprise-level applications.
-
Assess the Community and Ecosystem: React has a large and active community, Vue has a growing community, and Angular has strong community support from Google.
-
Evaluate Performance: React and Vue offer efficient rendering, while Angular optimizes large applications.
-
Consider Flexibility and Customization: React offers high flexibility, Vue balances flexibility and conventions, and Angular provides a comprehensive solution with built-in features.
-
Evaluate the Tooling and Ecosystem: React has a wide range of libraries and tools, Vue has its official solutions, and Angular offers a complete set of tools.
-
Consider Community Feedback and Adoption: React and Vue are widely adopted, while Angular has a strong presence in enterprise-level projects.
-
Assess Long-term Maintenance and Support: React and Vue have active maintenance, while Angular is supported by Google and offers long-term support.
-
Consider Team Skills and Expertise: Leverage existing team skills if they have experience with a specific framework, or consider the learning curve and available resources for skill development.
Adopting a Module Bundler
Module bundlers like Webpack, Parcel, and Rollup have become essential to modern front-end development. They allow you to bundle your project's assets (JavaScript, CSS, images, etc.) into efficient, optimized files for deployment.
Adopting a module bundler in your pipeline allows for the following:
-
Code Splitting: Break your code into smaller, more manageable chunks that can be loaded on-demand.
-
Tree Shaking: Eliminate dead code and unused dependencies from your final bundles.
-
Transpilation: This is the process of converting modern JavaScript syntax (ES6+) to widely supported ES5 syntax. It ensures that your code is compatible with older browsers that may not support the latest JavaScript features, thereby expanding your application's reach.
-
Asset Optimization: Minify, compress, and optimize your assets to reduce file sizes and improve loading times.
Here's an overview of the pros and cons of each bundler:
 Webpack
Pros:
Highly flexible and widely adopted bundler with a rich ecosystem
Extensive customization options and support for advanced features like code splitting and hot module replacement
Suitable for complex projects with diverse dependencies and module systems
Cons:
Steep learning curve and can be more configuration-heavy
Configuration setup can be complex, especially for beginners
Larger bundle sizes compared to other bundlers
 Parcel
Pros:
Zero-configuration setup and easy to use
Provides a simple and intuitive developer experience
Automatic handling of bundling, minification, and hot module replacement
Cons:
Limited customization options and may require additional configuration for complex setups
Plugin ecosystem may not be as extensive as Webpack
Less suitable for large-scale or highly customized projects
 Rollup
Pros:
Lightweight and efficient bundler, ideal for creating optimized bundles
Excellent at producing smaller bundle sizes
Effective tree shaking capabilities for removing unused code
Cons:
Requires more manual configuration and setup compared to other bundlers
Plugin ecosystem may not be as extensive as Webpack
Less suitable for projects with complex module systems or large dependency graphs
How to choose a bundler for your project:
- Understand Your Needs: Identify what you want to achieve with a bundler, such as bundling and optimizing JavaScript, CSS, and assets.
- Compare Features: Look at each bundler's main features, such as code splitting, performance optimization, and ease of use. Choose the one with the features you need.
- Consider Configuration: Evaluate the complexity of each bundler's configuration. Based on your team's expertise, choose one that is easy to set up and configure.
- Check Community Support: Assess the size and activity of the communities surrounding each bundler. A larger community means more resources, support, and potential solutions.
- Assess Learning Curve: Consider the learning curve associated with each bundler. Choose one that aligns with your team's skill level and the time available for learning.
- Integration with Other Tools: Consider how well each bundler integrates with other tools in your project, such as CSS preprocessors or task runners.
- Performance Considerations: Evaluate the performance optimizations provided by each bundler, such as code minification, compression, and asset loading. Choose one that meets your performance goals.
- Tooling and Ecosystem: Consider the availability of plugins, loaders, and other tools that can enhance your development workflow. Choose a bundler with a supportive ecosystem.
- Future Maintenance: Choose an actively maintained bundler with a roadmap for future improvements. This ensures ongoing support and compatibility with future technologies.
-
Install Webpack and required plugins
npm install webpack webpack-cli --save-dev
-
Create a Webpack configuration file (e.g., webpack.config.js) in the root of your project:
const path = require('path');

module.exports = {
  entry: './src/index.js', // Entry point of your application
  output: {
    path: path.resolve(__dirname, 'dist'), // Output directory
    filename: 'bundle.js', // Output file name
  },
  module: {
    rules: [
      {
        test: /\.js$/, // Apply loaders to JavaScript files
        exclude: /node_modules/,
        use: {
          loader: 'babel-loader', // Example: Use Babel to transpile JavaScript
          options: {
            presets: ['@babel/preset-env'],
          },
        },
      },
      // Add more rules for different file types (e.g., CSS, images, etc.)
    ],
  },
  // Add plugins and other configuration options as needed
};
-
Customize the configuration to fit your project's needs
-
Create a script in your package.json file to run Webpack:
{
    "scripts": {
        "build": "webpack --config webpack.config.js"
    }
}
-
Run Webpack using the configured script:
npm run build
Embracing a CSS Preprocessor
CSS preprocessors such as Sass, Less, and Stylus provide powerful features that extend the capabilities of plain CSS. CSS preprocessors help streamline the development process, reduce code duplication, promote consistency, and enhance code organization; they allow you to write cleaner, more maintainable CSS code by adding:
- Variables: Store reusable values such as colors, fonts, and sizes
- Nesting: Write nested CSS rules to better reflect the structure of your HTML
- Mixins: Create reusable chunks of CSS code that can be included in other stylesheets
- Functions: Perform calculations and manipulate values in your stylesheets. It allows you to create versatile styles that adapt to different situations. For example, you can define a function that generates different font sizes based on screen sizes
Here's an overview of the pros and cons of each CSS preprocessor:
 Sass
Sass
Pros:
Mature and widely adopted CSS preprocessor
Offers a rich set of features, including variables, mixins, nesting, and inheritance, which enhance productivity and code maintainability
Large community support and extensive documentation
Can be easily integrated into existing projects
Cons:
Requires a build step to compile Sass code into CSS, which adds complexity to the development process
Learning curve, especially for beginners not familiar with CSS preprocessors
 Less
Less
Pros:
Easy to learn and use, especially for developers already familiar with CSS
Offers a similar set of features as Sass, such as variables, mixins, and nested rules
Supports both traditional CSS and less specific syntax
Good browser compatibility and can be used with minimal configuration
Cons:
Smaller community compared to Sass, resulting in comparatively fewer community-created tools and resources
Limited support for advanced features like built-in functions and control directives
Less tooling and integration options compared to Sass
 Stylus
Pros:
Concise and expressive syntax, with a focus on simplicity and readability
Powerful features like variables, mixins, and nested selectors
Extensive flexibility and customization options
Supports both CSS-like and indented syntax
Cons:
Smaller community compared to Sass and Less, which may result in fewer resources and community-generated tools
Learning curve, especially for developers not familiar with Stylus or CSS preprocessors in general
Limited tooling and integration options compared to Sass
How to choose a CSS preprocessor for your project:
- Identify Project Needs: Understand what you want to achieve with a preprocessor, such as code organization, reusability, or improved productivity.
- Compare Features: Look at each preprocessor's main features, such as variables, mixins, nesting, and inheritance. Choose the one with the features you need.
- Consider Ease of Use: Evaluate each preprocessor's learning curve and ease of adoption. Choose the one your team finds the most user-friendly and intuitive.
- Check Community Support: Assess the size and activity of the communities surrounding each preprocessor. A larger community means more resources, support, and potential solutions to problems.
- Evaluate Integration: Consider the compatibility of each preprocessor with your existing tools, build systems, and editors. Choose one that integrates smoothly into your development workflow.
- Assess Long-Term Viability: Look for actively maintained preprocessor options with a roadmap for future improvements. This ensures ongoing support and enhancements.nts and ongoing support and compatibility with future technologies.
-
Install required dependencies
npm install sass sass-loader css-loader style-loader --save-dev
-
Update your Webpack configuration file (webpack.config.js) to add the necessary loaders
module.exports = {
  // ...other configuration options
  module: {
    rules: [
      // ...other rules
      {
        test: /\.s[ac]ss$/i, // Match .scss or .sass files
        use: [
          'style-loader', // Injects styles into the DOM
          'css-loader', // Translates CSS into CommonJS
          'sass-loader', // Compiles Sass to CSS
        ],
      },
    ],
  },
};
-
Create a Sass file (e.g., styles.scss) and import it into your JavaScript entry file (e.g., index.js)
// styles.scss
body {
  background-color: #f1f1f1;
}
// index.js
import './styles.scss';
-
Build and run your Webpack project
npm run build
Linters and formatters such as ESLint, Prettier, and Stylelint help enforce consistent coding styles and catch potential errors before they become problems. Spend your team’s time reviewing code and approaches, not formatting issues. And spend less time on issues related to tiny bugs that could have been avoided. Integrating these tools into your build pipeline can:
- Improve Code Quality: Automatically catch syntax errors, potential bugs, and performance issues.
- Enforce Coding Standards: Ensure a consistent coding style across your team, making the codebase easier to read and maintain.
- Streamline Code Reviews: Reduce the time spent on nitpicking code formatting during code reviews by automating the process.
- Avoid Tiny Bugs: Without linters, you might overlook common syntax errors and unused variables or parameters.
To make the most of these tools, set up pre-commit hooks that automatically lint and format your code before each commit. Here's an example of how you can configure it:
-
Install the required packages
npm install husky lint-staged eslint prettier --save-dev
-
Configure ESLint: Create an ESLint configuration file (e.g., .eslintrc.js) at the root of your project and specify your desired rules and configurations. For example:
module.exports = {
  // ESLint rules and configurations
  // ...
};
-
Configure Prettier: Create a Prettier configuration file (e.g., .prettierrc.js) in the root of your project and specify your desired formatting rules. For example:
module.exports = {
  // Prettier formatting rules
  // ...
};
-
Configure Husky and lint-staged: In your package.json file, add the following configuration:
{
   "husky": {
     "hooks": {
       "pre-commit": "lint-staged"
     }
   },
   "lint-staged": {
     "*.{js,jsx,ts,tsx}": ["eslint --fix", "prettier --write", "git add"]
   }
}
This configuration sets up a pre-commit hook using Husky that triggers lint-staged, which in turn runs ESLint with the fix flag to fix linting issues and Prettier to format the code automatically. Finally, it stages the modified files using git add.
-
Run the pre-commit hook: When you commit, the pre-commit hook will automatically run ESLint and Prettier on the staged files. If there are any linting errors or formatting inconsistencies, it will attempt to fix them before the commit is made.
Running tests
Running tests is crucial to JavaScript project development to ensure code quality and reliability. This brief guide will cover two critical types of tests: unit tests and end-to-end testing.
Unit Tests
Unit tests focus on isolating individual units or components of your code. Here's a brief overview:
- Purpose: Verify the correctness of small, independent units of code.
- Scope: Each test targets a specific function, module, or component.
- Dependencies: External dependencies are often mocked or stubbed to isolate the unit being tested.
- Tooling: Popular unit testing frameworks for JavaScript include Jest, Mocha, and Jasmine
 Jest
Jest
Pros:
All-in-one Solution: Jest comes bundled with everything you need for testing, including test runners, assertions, mocking, and code coverage
Easy Setup: Jest is known for its simple and straightforward setup process, making it beginner-friendly
Snapshot Testing: Jest offers a convenient snapshot testing feature for comparing test output with saved snapshots
Parallel Execution: Jest can run tests in parallel, making it faster for large test suites
Strong Community: Jest has a large and active community, providing extensive support and resources
Cons:
Learning Curve: Jest may have a learning curve, especially when configuring complex setups or advanced features
Opinionated: Jest follows its conventions, which may not integrate smoothly with existing projects or preferences
 Mocha
Mocha
Pros:
Flexibility: Mocha is highly flexible and allows you to choose your preferred assertion library, mocking framework, and other tools
Large Ecosystem: Mocha has a vast ecosystem with a wide range of plugins and integrations
Async Testing: Mocha has excellent support for testing asynchronous code
Simple Syntax: Mocha's syntax is clean and easy to read, making it accessible for developers
Cons:
Configuration Required: Mocha requires additional configuration to set up assertions, mocking, and other testing tools
Minimalist Approach: Mocha's simplicity can sometimes result in a lack of built-in features, requiring additional libraries for certain functionalities
 Jasmine
Pros:
Easy to Get Started: Jasmine has a simple and intuitive syntax, making it beginner-friendly
Self-Contained: Jasmine provides everything you need for testing in a single package, reducing the need for additional dependencies
Readable Tests: Jasmine's syntax is designed to create readable and descriptive tests
Built-in Mocking: Jasmine has built-in support for mocking and spies, making it easy to test dependencies
Cons:
Limited Ecosystem: Jasmine's ecosystem is smaller compared to Jest and Mocha, resulting in fewer plugins and integrations
Slower Execution: Jasmine can be slower than other frameworks when running large test suites
Opinionated Syntax: Jasmine's syntax may not align with personal preferences or existing project standards
End-to-End Testing
End-to-end (E2E) testing simulates real user scenarios by testing the entire application flow. Here's a brief overview:
- Purpose: Validate the behavior and functionality of the entire application from start to finish.
- Scope: Tests cover multiple components, interactions, and external dependencies.
- Dependencies: Real or simulated dependencies are used to mirror the actual environment.
- Tooling: Frameworks like Playwright, Cypress, and Puppeteer are commonly used for E2E testing.
 Playwright
Pros:
Cross-browser Support: Playwright allows you to test your applications across different browsers like Chrome, Firefox, and Safari
Multi-page and Multi-context Support: Playwright can handle multiple pages and contexts within a single browser instance, making it suitable for complex testing scenarios
Powerful Automation API: Playwright offers a robust automation API with features like intercepting network requests and emulating mobile devices
Speed and Reliability: Playwright is known for its fast test execution and reliable results, reducing flakiness in tests
Active Community: Playwright has a growing community, providing support and regular updates
 Cypress
Pros:
Easy Setup: Cypress has a simple setup process, allowing you to get started quickly
Built-in Features: Cypress includes built-in features like time-travel debugging, automatic waiting, and real-time reloading
Interactive Test Execution: Cypress provides an interactive test runner that allows you to see the application state during test execution
Comprehensive Documentation: Cypress offers extensive documentation and an active community for support
Excellent Developer Experience: Cypress focuses on providing a seamless testing experience with a user-friendly interface
Cons:
Limited Browser Support: Cypress primarily supports modern browsers and has limited cross-browser testing capabilities
Single Tab Limitation: Cypress only supports testing within a single browser tab, which may be limiting for specific scenarios
 Puppeteer
Pros:
Headless Chrome Automation: Puppeteer is built on top of the Chrome DevTools Protocol, offering powerful Chrome automation capabilities
Versatile Web Scraping: Puppeteer is widely used for web scraping tasks due to its ability to navigate and interact with web pages
Extensive API: Puppeteer provides a comprehensive API for controlling Chrome and handling various web automation tasks
Active Development: Puppeteer is actively maintained by the Google Chrome team and receives regular updates
Cons:
Limited to Chrome: Puppeteer only supports Chrome and does not have built-in cross-browser testing capabilities
Lower-level API: Puppeteer's API is more low-level compared to other frameworks, requiring more code for common testing scenarios
Steeper Learning Curve: Using Puppeteer effectively may require a deeper understanding of Chrome's DevTools Protocol
Leveraging Continuous Integration (CI) and Continuous Deployment (CD)
Continuous Integration (CI) and Continuous Deployment (CD) are practices that involve automatically building, testing, and deploying your code whenever changes are made. By incorporating CI/CD into your build pipeline, you can:
- Catch errors early: Automatically run tests and linters on every commit, alerting you to potential issues before they reach production.
- Code quality analysis: SonarQube performs static code analysis to identify code smells, bugs, vulnerabilities, and other quality issues. It analyzes your codebase against predefined rules and provides detailed reports highlighting areas that need improvement. Integrating SonarQube into your CI/CD pipeline lets you catch code issues early and ensure that your codebase adheres to best practices and industry standards.
- Automate deployments: Automatically deploy your code to staging or production environments, reducing the risk of human error.
- Streamline collaboration: Ensure that all team members are always working with the latest, error-free code.
Popular CI/CD platforms include GitHub Actions, GitLab CI/CD, and CircleCI.
 GitHub Actions
 GitLab CI/CD
Pros:
Comprehensive DevOps platform
Powerful pipeline configuration
Support for self-hosted runners
 CircleCI
To give you an idea of how a CI/CD platform could work for your team, let’s explore how you could use GitHub Actions.
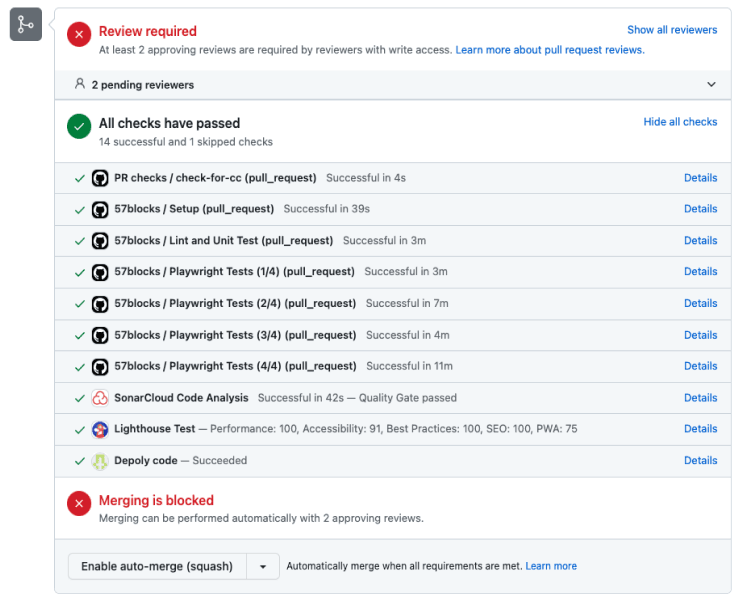
Start by configuring a GitHub Actions workflow to be triggered when an event occurs in your repository, such as an open or updated pull request. Your workflow may contain one or more jobs that can run in sequential order or in parallel.
Here's an example of a GitHub Actions workflow:
- Check whether the PR contains relevant descriptions
- Step environment, such as installing nodes, dependencies, pulling code, etc
- Run unit tests and linters
- Run end-to-end tests in parallel
- Run code analysis
- Run lighthouse test
- Deploy the code to CDN
To use GitHub Actions in your project, follow these steps:
- Set up a GitHub repository: Create a new GitHub repository or navigate to an existing repository where you want to use GitHub Actions.
- Define your workflow: Create a new directory called .github/workflows inside your repository. This is where you'll define your workflow configuration files.
- Create a workflow file: Inside the .github/workflows directory, create a new YAML file (e.g., main.yml) to define your workflow's configuration. This file will contain the steps and actions that make up your workflow.
- Define the workflow configuration: In the workflow file, you'll define the events that trigger the workflow and the jobs that need to be executed. You can use predefined actions, run custom scripts, or combine both. Here's a simple example that runs tests on every push to the main branch:
name: CI

on:
  push:
    branches:
      - main

jobs:
  build:
    runs-on: ubuntu-latest

    steps:
      - uses: actions/checkout@v2

      - name: Install dependencies
        run: npm ci

      - name: Run tests
        run: npm test

